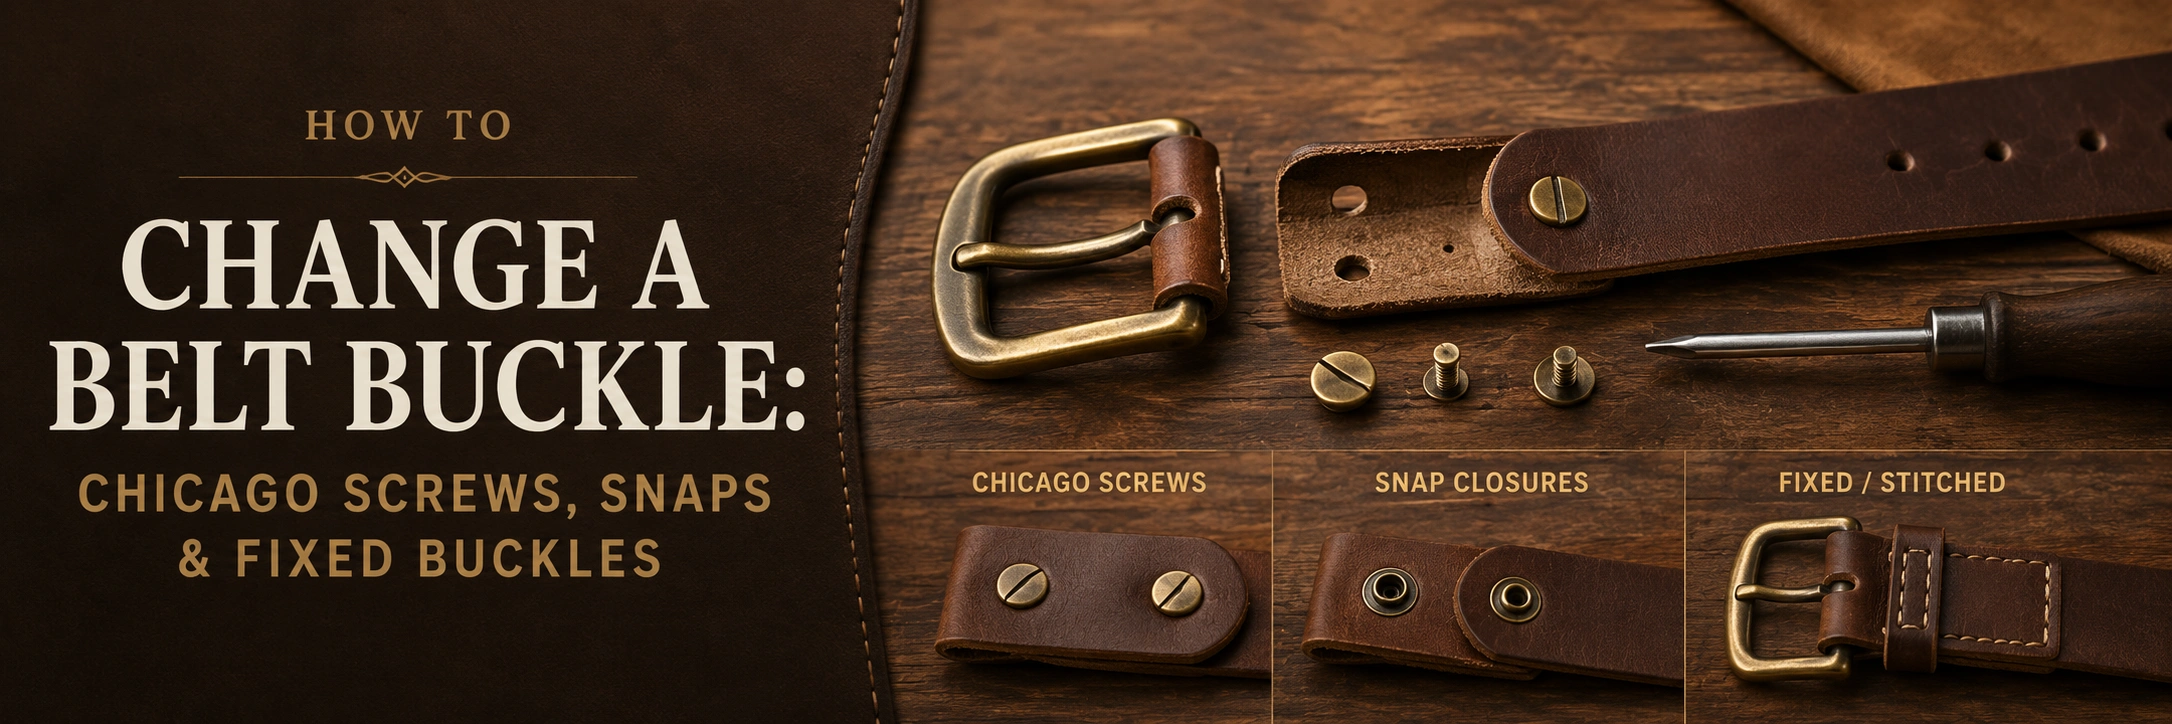
You can change a belt buckle when the buckle end is secured with Chicago screws, snaps, or another removable fastener. Buckles attached with permanent rivets or stitching usually require tools or professional repair.
Before removing anything, confirm two details: how the original buckle is attached and whether the replacement buckle fits the strap.
A buckle that looks suitable may still have the wrong bar width, tongue position, or space for the leather fold and keeper loop. Forcing an incompatible buckle into place can damage the leather or create an insecure connection.
Identify the attachment system before buying or removing a replacement buckle.
Quick Answer: Can You Change the Buckle on Any Belt?
No. Whether a belt buckle can be changed depends on how the buckle end was constructed.
| Attachment Type | Can It Be Changed? | Difficulty |
|---|---|---|
| Chicago screws | Usually yes | Easy |
| Snap closures | Usually yes | Easy |
| Removable screw plate | Usually yes | Easy to moderate |
| Permanent rivets | Possible with tools | Moderate |
| Stitched buckle end | Usually professional work | Difficult |
| Molded synthetic construction | Usually no | Replace the belt |
Chicago screws and snaps are designed to open and close without destroying the leather. Rivets and stitching are permanent attachment methods, even though they may look similar from a distance.
Not every round metal fastener is a screw. A Chicago screw normally has a visible slot on at least one side. A fixed rivet has no usable screw head and will not turn with a screwdriver.
Do not pry or twist an attachment until its construction is clear. Forcing a fixed buckle end may tear the leather around the fastener holes.
Step 1: Identify How the Buckle Is Attached
Lay the belt flat and inspect both sides of the folded leather behind the buckle.
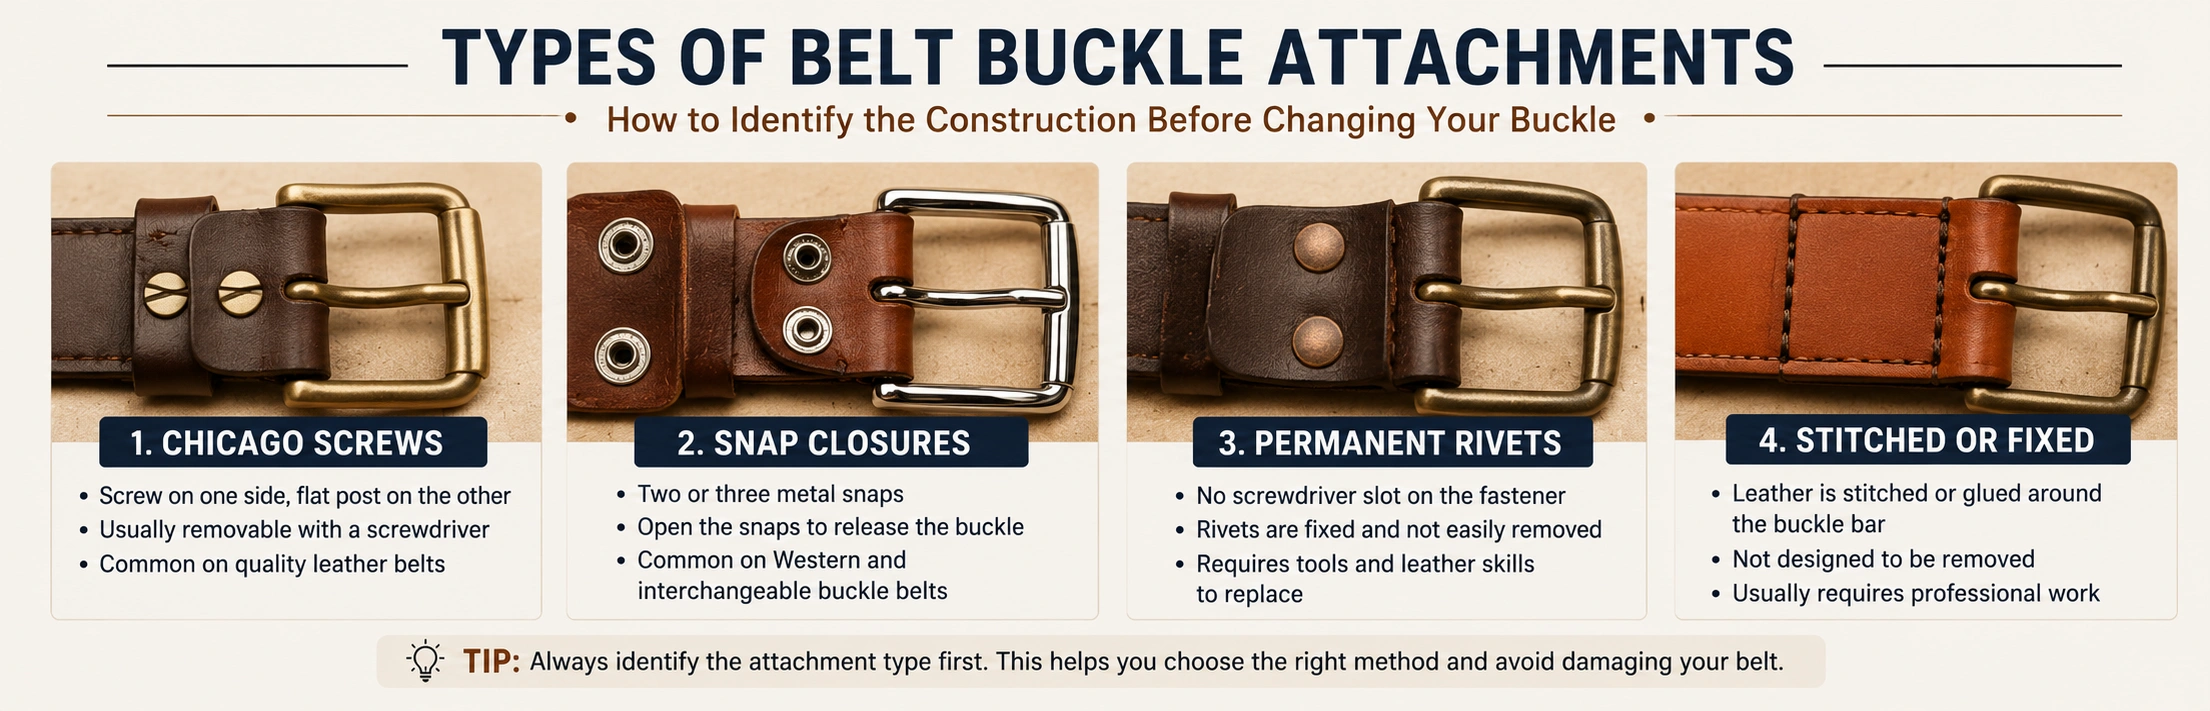
Chicago Screws
Chicago screws are two-piece fasteners consisting of a screw and a hollow post.
Common signs include:
-
A flathead or Phillips slot on one side
-
A smooth, flat post head on the other
-
A fastener passing through the folded leather
-
One or two screws near the buckle and keeper loop
These screws can normally be removed and installed again.
Some removable-buckle belts use Chicago screws because the same opening also makes it possible to shorten a leather belt with a removable buckle.
Snap Closures
A snap-on buckle end usually has two or three metal snaps behind the buckle.
Opening the snaps releases the folded section of leather so the buckle bar and keeper loop can be removed.
This construction is common on Western belts and belts designed for interchangeable buckles.
Permanent Rivets
Permanent rivets may look similar to Chicago screws, but they have no usable screwdriver slot.
Both sides normally appear fixed and smooth. Removing them usually requires drilling or cutting the old rivet and installing a new load-bearing fastener.
Stitched Or Fixed Buckles
Some belts are folded around the buckle bar and stitched closed. Adhesive may also be used inside the fold.
Other belts use molded synthetic material that permanently captures the buckle.
These are not simple removable-buckle systems.
If you cannot find a screw, snap, or removable plate, treat the buckle as fixed until the construction is confirmed.
For a Chicago screw buckle, you will usually need the correct-size screwdriver, a second screwdriver or broad coin for the opposite side, a soft cloth, and the replacement buckle. Pliers wrapped in cloth may help hold a smooth post, but they should be used carefully.
Permanent rivet removal may require a drill, leather punch, rivet setter, and correctly sized replacement rivets. It is not recommended as a beginner project.
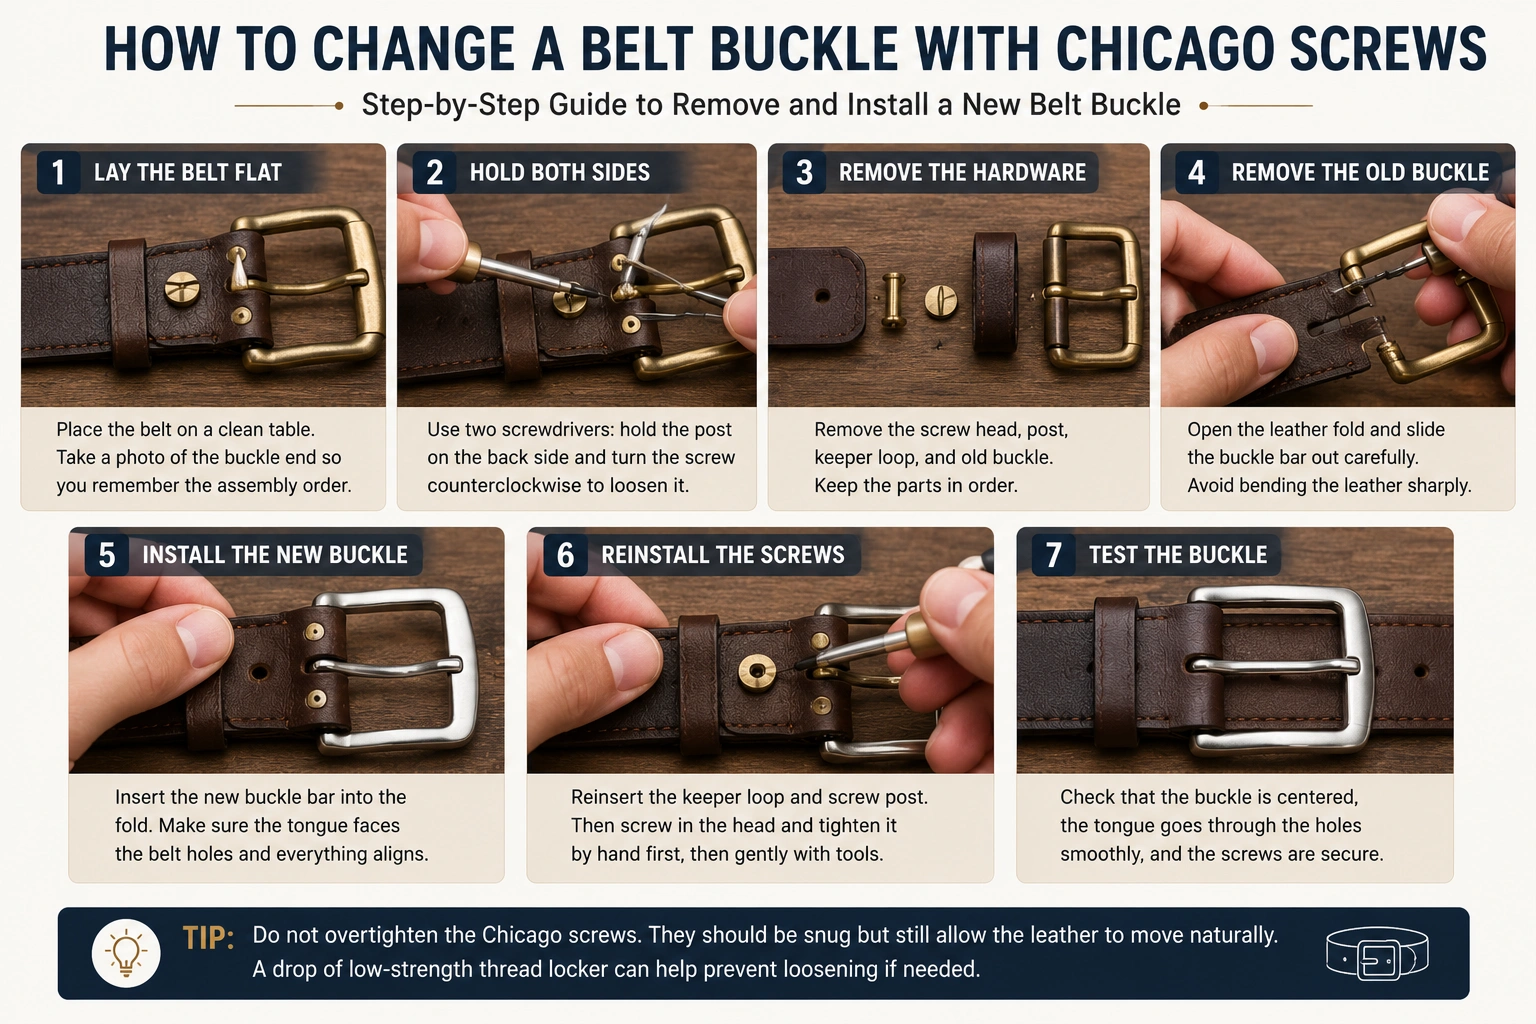
How to Change a Belt Buckle With Chicago Screws
Chicago screws make buckle replacement relatively straightforward, but the parts should be removed in the correct order.
1. Lay the Belt Flat
Place the belt on a clean table covered with a soft cloth.
This protects the leather and buckle from scratches and prevents small hardware from rolling away.
Take a photo of the buckle end before disassembly. The photo will help you remember the position of the buckle, keeper loop, fold, and screws.
2. Hold Both Sides of the Screw
Place the correct screwdriver into the visible screw head.
Hold the post on the opposite side with a second screwdriver, a broad coin if the slot allows it, or cloth-covered pliers.
Turn the screw counterclockwise.
If only one side is held, the entire Chicago screw may rotate without loosening.
3. Remove the Hardware
Remove and set aside:
-
Screw heads
-
Screw posts
-
Keeper loop
-
Old buckle
Keep the parts together and note which direction each component faced.
4. Remove the Old Buckle
Gently unfold the leather and slide the buckle bar out of the folded end.
Do not sharply bend leather that feels dry, stiff, or cracked. The fold is already a high-stress area, and excessive bending may cause the surface to split.
5. Install the New Buckle
Slide the replacement buckle bar into position.
Check that:
-
The buckle tongue points toward the belt holes
-
The buckle sits on the correct side of the fold
-
The keeper loop is returned to its original position
-
The existing fastener holes align
-
The leather lies flat without twisting
6. Reinstall the Screws
Insert the Chicago screw posts through the original holes and start the screws by hand.
Hand-starting reduces the risk of cross-threading.
Tighten each screw until the buckle connection feels secure. Do not overtighten it. Excessive pressure can compress the leather, damage the threads, or make future removal difficult.
7. Test the Buckle
Before wearing the belt, check that:
-
The buckle is centered
-
The tongue enters the belt holes correctly
-
The keeper loop holds the belt tail
-
The leather fold remains flat
-
The screws do not move
-
The buckle does not scrape or pinch the leather
Pull the buckle and strap in opposite directions with moderate hand pressure. If the connection moves or the screws loosen, correct the installation before wearing it.
Changing Snap-On, Riveted And Stitched Buckles
A snap-on belt buckle is even easier to change:
-
Open each snap near the buckle.
-
Unfold the leather buckle end.
-
Slide the old buckle bar out.
-
Insert the new buckle bar.
-
Reposition the keeper loop.
-
Fold the leather back into place.
-
Close every snap completely.
-
Pull-test the buckle before wearing the belt.
Open the snaps by lifting near the fastener. Do not pull hard on the buckle itself, because this places unnecessary force on the leather and snap attachments.
If a snap is loose, corroded, or pulling away from the leather, replacing only the buckle will not solve the problem.
A riveted buckle can sometimes be replaced, but the old rivets must be removed and new load-bearing fasteners installed. A stitched buckle end usually requires cutting the stitches and sewing the leather again.
Professional repair is the safer choice when:
-
The leather around the buckle is cracked
-
The fastener holes have enlarged
-
New holes or trimming are required
-
The buckle end is thin or weakened
-
The correct rivet size is uncertain
-
The belt has significant value
Replacing a fixed buckle is no longer a simple buckle swap—it becomes a leather repair.
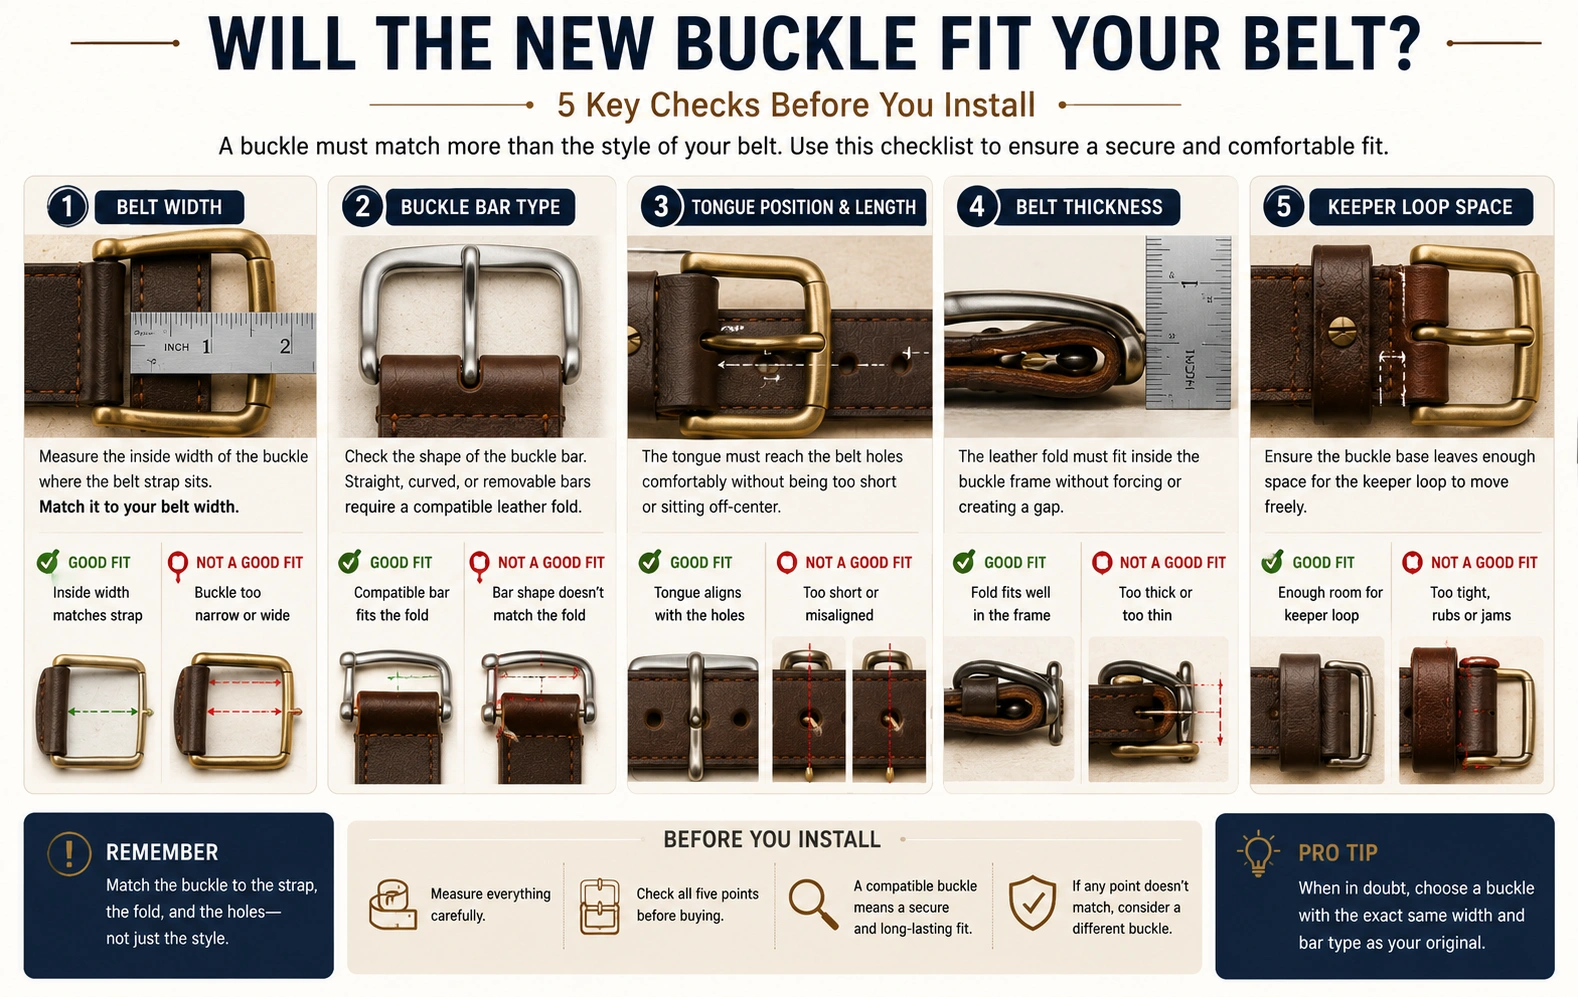
Will Any Buckle Fit Any Belt?
No. A replacement buckle must match more than the appearance of the belt.
Belt Width
Measure the usable inside width of the replacement buckle bar, not the buckle’s total outside width.
A buckle designed for a 1.25-inch strap will not normally fit a 1.5-inch belt. Even if the leather can be forced through, it may bunch, rub, or prevent the buckle from sitting flat.
Our guide on how to choose the right belt width explains common belt widths and how they relate to jeans, casual pants, and dress trousers.
Buckle Bar And Tongue
Check the buckle bar’s shape and the length, width, and position of the tongue.
The tongue must reach the belt holes without sitting at an awkward angle. A tongue that is too short may not engage securely. One that is too wide may not fit the existing holes.
Do not enlarge the holes simply to compensate for an incompatible buckle. When an additional hole is genuinely needed, follow a proper method to add holes to a leather belt safely.
Belt Thickness
The leather must fold around the buckle bar without excessive pressure.
A very thick belt may not fit through a narrow buckle connection or may prevent the folded end from lying flat. Thickness also affects how much screw-post length is required.
Learn more about choosing an appropriate leather belt thickness.
Keeper Loop Space
A larger replacement buckle may extend farther into the folded section and reduce the space available for the keeper loop.
Without enough room, the loop may sit at an angle or fail to hold the belt tail properly.
Match the buckle to the strap width, thickness, bar design, tongue position, and fold-back construction—not only to its style.
Troubleshooting Chicago Screws And Avoiding Common Mistakes
If a Chicago screw will not loosen, stop before damaging the screw head or leather.
When the whole fastener spins, hold the post side with a second screwdriver or cloth-covered pliers while turning the screw counterclockwise.
When the screw is extremely tight, confirm that the screwdriver fits the slot correctly. Apply steady downward pressure and turn slowly. A small screwdriver in a large slot is more likely to slip and damage the head.
If the screw head is already stripped, do not continue letting the tool spin. Adding a thin rubber layer between the screwdriver and screw may improve grip, but badly damaged hardware is better handled by a repair professional.
Some screws are installed with thread locker. Do not apply direct heat to the leather or soak the area with penetrating oil. Both methods can damage or stain the belt.
Common mistakes include:
-
Buying a buckle before measuring the strap
-
Assuming every rivet is a Chicago screw
-
Using the wrong screwdriver size
-
Scratching leather with unprotected pliers
-
Forgetting to reinstall the keeper loop
-
Overtightening the screws
-
Installing a tongue that does not align with the holes
A small amount of removable thread-locking compound may help screws that repeatedly loosen, but it should be used sparingly and kept away from the leather. Do not use permanent thread locker if you intend to change the buckle again.
Should You Change the Buckle or Replace the Belt?
Change the buckle when the belt body remains strong, the folded end is not badly cracked, the fastener holes retain their shape, and the replacement buckle is compatible.
A buckle replacement makes sense when the original hardware is broken, uncomfortable, or no longer suits the way you wear the belt.
Repair or replace the belt when:
-
The buckle attachment area is torn
-
The leather is deeply cracked at the fold
-
Screw or rivet holes have enlarged
-
Layers of material are separating
-
Stitching around the buckle is failing
-
A new buckle cannot create a secure connection
A new buckle cannot restore strength to leather that is already failing.
See whether it is practical to repair a cracked leather belt before reusing a damaged buckle end. When several structural problems are present, it may be safer to consider when to replace a leather belt.
Removable buckle systems make future adjustment and hardware replacement easier. They allow a good strap to remain in use when only the buckle needs changing.
A removable buckle system makes adjustment and future hardware replacement easier, but the surrounding leather must still remain strong.
Explore our leather belts with removable hardware for designs that allow easier buckle removal, adjustment, and replacement.
Final Verdict
Chicago screws and snap closures are the easiest buckle attachments to change at home.
Permanent rivets and stitched buckle ends can sometimes be modified, but the work involves removing and replacing load-bearing parts. At that point, buckle replacement becomes a leather repair rather than a simple hardware change.
Always identify the attachment before taking the belt apart.
Then confirm that the replacement buckle matches the strap width, leather thickness, buckle bar, tongue position, hole alignment, and keeper-loop space.
After installation, test the buckle, fasteners, tongue, and leather fold before wearing the belt.
A replacement buckle can restore a strong belt. It cannot repair cracked leather, enlarged holes, or a weakened attachment area.
Changing a belt buckle is straightforward when the belt has removable hardware and the replacement buckle is compatible. The most important step is identifying the attachment system before taking the belt apart.
Frequently Asked Questions
Can You Change the Buckle on Any Belt?
No. Belts using Chicago screws, snaps, or removable plates usually allow easy buckle replacement. Riveted and stitched buckle ends require tools or professional repair. Molded synthetic belts generally cannot be opened without damaging the belt.
How Do I Know if My Belt Buckle Is Removable?
Inspect both sides of the folded leather behind the buckle. Visible screw slots, snap closures, or a removable plate usually indicate a replaceable buckle. If you see only smooth rivets or continuous stitching, treat the buckle as fixed.
What Is a Chicago Screw on a Belt?
A Chicago screw is a two-piece fastener made from a screw and a hollow post. It passes through the folded buckle end and can normally be removed with screwdrivers, allowing the buckle and keeper loop to be changed or repositioned.
How Do You Remove a Belt Buckle With Screws?
Lay the belt flat, hold the screw post from one side, and turn the screw head counterclockwise from the other. Remove the screws, unfold the leather, and slide out the buckle bar. Keep the keeper loop and hardware in their original order.
Will Any Buckle Fit Any Leather Belt?
No. The buckle must match the strap width, leather thickness, buckle-bar design, tongue position, existing holes, and space available for the keeper loop. Matching only the buckle’s appearance is not enough.
Why Does My Belt Buckle Keep Coming Loose?
The Chicago screws may be insufficiently tightened, worn, too short for the leather thickness, or missing a suitable removable thread locker. Enlarged holes or weakened leather can also allow movement. Inspect the attachment area before tightening the screws again.